How
easy would it be to switch on your fan automatically as and when the
temperature increases or decreases? All you need to do is, set a trigger
temperature at which the fan should switch on or off. Using W1209
module, which is highly functional and low cost can help you to invent
such minor yet amazing automation in your home!
W1209
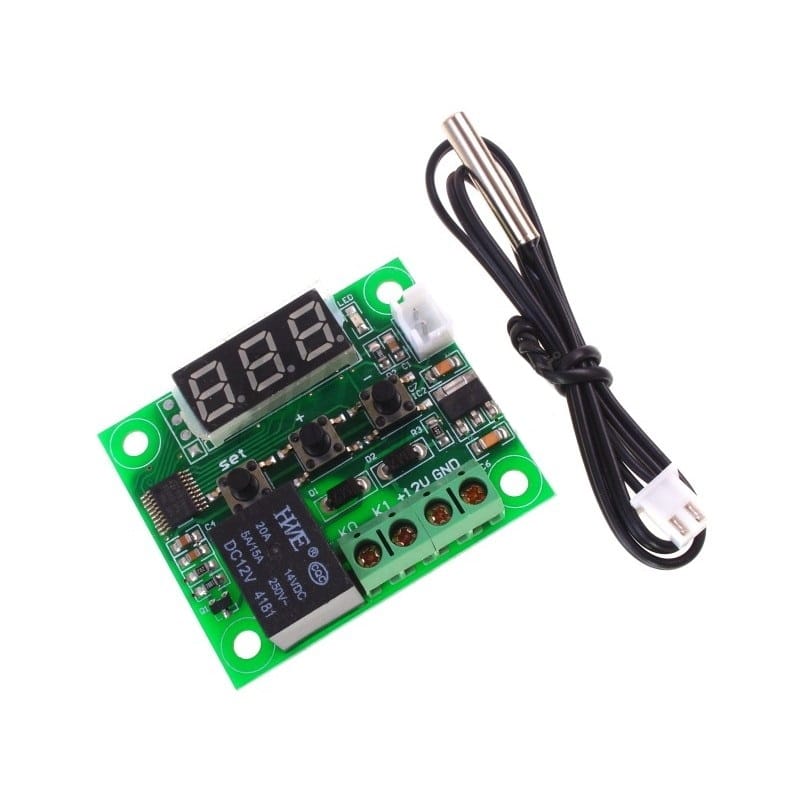
thermostat module has a temperature sensor, keys, LED display, relay
and requires DC 12V power supply. It is an affordable, good quality
thermostat controller. Thermostats are devices that sense the
temperature of a system so that the temperature is maintained at the
desired set point or near to it. NTC temperature sensor allows the
module to intelligently control varied electrical devices based on the
temperature. NTC thermistor has a negative temperature coefficient,
which means the resistance decreases with increasing temperature. W1209
has an inbuilt embedded micro-controller, thus not much programming
knowledge is required. The module consists of three switches to
configure the various parameters including ON and OFF trigger
temperatures. The relay can operate at voltages up to a maximum of 240V
AC at 5A or 14V DC at 10A to power on. The temperature is displayed in
degree centigrade and with the help of 7-segment display and the relay,
the state is displayed with the help of the LED present on the W1209
module.
W1209 Module SPECIFICATIONS:-
- Temperature Control Range: -50 ~ 110 C
- Resolution at -9.9 to 99.9: 0.1 C
- Resolution at all other temperatures: 1 C
- Measurement Accuracy: 0.1 C
- Control Accuracy: 0.1 C
- Refresh Rate: 0.5 Seconds
- Input Power (DC): 12V
- Measuring Inputs: NTC (10K 0.5%)
- Waterproof Sensor: 0.5M
- Output: 1 Channel Relay Output,
- Capacity: 10A
Power Consumption:-
- Static Current: <=35mA
- Current: <=65mA
Environmental Requirements:-
- Temperature: -10 ~ 60 C
- Humidity: 20-85%
Dimensions:-
- 48mm x 40mm x 14mm
Settings Chart:-
- Long press the “SET” button to activate the menu.
- Code Description Range Default Value
- P0 Heat C/H C
- P1 Backlash Set 0.1-15 2
- P2 Upper Limit 110 110
- P3 Lower Limit -50 -50
- P4 Correction -7.0 ~ 7.0 0
- P5 Delay Start Time 0-10 mins 0
- P6 High-Temperature Alarm 0-110 OFF
- Long pressing +- will reset all values to their default
Working:-
Current
temperature will be displayed on the module in degree Celsius by
default. When switched to a different mode, inactivity for approximately
5 seconds would lead to restoring the value of the module to the
default temperature display.
temperature will be displayed on the module in degree Celsius by
default. When switched to a different mode, inactivity for approximately
5 seconds would lead to restoring the value of the module to the
default temperature display.
Setting Modes:-
Trigger
Temperature:Press “SET” button on the module and current temperature
will be displayed on the screen. Using “+” and “-“ button, one can set
the temperature in 0.1 degrees (Celsius) increments. No activity for 2
seconds will result in setting and storing the trigger temperature and
then the screen will display the current temperature.
Parameters Setting:-
Pressing
the “SET” button for a minimum of 5 seconds will lead to the setting of
the parameter present in the module. The seven segment display will
start with the display of first parameter “P0”. Pressing ‘ + ’ or ‘ – ‘
buttons will help to go to parameters (P0-P6). Pressing “SET” button
midst the parameters will let you change the value for that parameter.
After setting the required parameter, press set button to exit that
option. If no button is pressed for 5 seconds the thermostat will exit
the parameter option and will return back to the default temperature.
Heating
Parameter P0: P0 has two settings, C and H. The default setting C can
be used to connect to an air-conditioner as the relay energizes when the
temperature is reached. Setting H leads to de-energizing the relay when
the required temperature is detected. It can be used to control any
heating device.
Parameter P0: P0 has two settings, C and H. The default setting C can
be used to connect to an air-conditioner as the relay energizes when the
temperature is reached. Setting H leads to de-energizing the relay when
the required temperature is detected. It can be used to control any
heating device.
Hysteresis Parameter P1: This parameter sets the range of change in temperature that must occur before relay will change state.
Parameter
P2 (Upper Limit Temperature): P2 limits the maximum trigger temperature
that can be set. It acts as a safety feature that stops the user to set
an extremely high trigger temperature.
P2 (Upper Limit Temperature): P2 limits the maximum trigger temperature
that can be set. It acts as a safety feature that stops the user to set
an extremely high trigger temperature.
Parameter
P3 (Lower Limit Temperature): P3 limits the minimum trigger temperature
that can be set. It also acts as a safety feature that stops the user
to set a low triggering temperature.
P3 (Lower Limit Temperature): P3 limits the minimum trigger temperature
that can be set. It also acts as a safety feature that stops the user
to set a low triggering temperature.
Offset
Correction Parameter P4: Changes can be made if there is a difference
between the displayed temperature and actual temperature reading with
this parameter.
Correction Parameter P4: Changes can be made if there is a difference
between the displayed temperature and actual temperature reading with
this parameter.
Delay
Parameter P5: Delay in the switching of the relay when the trigger
temperature has reached, can be set by the help of delay parameter P5.
It can be set in one-minute increments up to a maximum of 10 minutes.
Parameter P5: Delay in the switching of the relay when the trigger
temperature has reached, can be set by the help of delay parameter P5.
It can be set in one-minute increments up to a maximum of 10 minutes.
Alarm
Parameter P6: This parameter causes the relay to switch off when the
temperature reaches its settings. The display will show ‘ — ‘ to
indicate an alarm condition. The relay will not re-energize until the
temperature falls below this value.
Parameter P6: This parameter causes the relay to switch off when the
temperature reaches its settings. The display will show ‘ — ‘ to
indicate an alarm condition. The relay will not re-energize until the
temperature falls below this value.
* Product Images are shown for illustrative purposes only and may differ from actual product.
No Guarantee No Warranty











Reviews
There are no reviews yet.